Dog agility is one of the best sports to exercise, train, and have fun with your four-legged friend. To get started, you will need some equipment.
But as many beginners don’t know, an official course isn’t only made up of jumps, tunnels, and weave poles. Contact obstacles such as the A-frame, dog walk, and seesaw are also essential to master.
Thus, you should know what they are and how to train your dog on them. If he’s only familiar with a few obstacles, he’s not ready to compete in agility.
Not long ago, I found out that the A-frame, dog walk, and seesaw can be placed in a beginner course while reading the AKC Agility Beginner’s Guide. So I’ve done more research on contact obstacles. Let me share with you everything I’ve learned about them.
What Obstacles Are In A Dog Agility Course?
Depending on the organization and class in which your dog competes, the number and type of obstacles can vary. In general, an agility course has between 14 and 20 obstacles.
It can include different types of jumps, at least one open tunnel, a grouping of 10 to 12 weaving poles, a pause table/box, and contact obstacles.
Tunnels.
An open tunnel is one of the most common obstacles on an agility course. It’s an excellent starting point because it’s easy for your dog to run through a long fabric/PVC tube. Since at least one tunnel is required on the course, you must train him to master this obstacle.
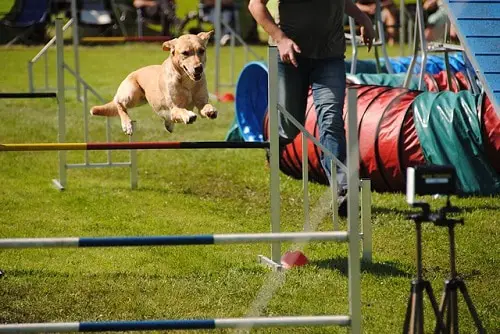
Jumps.
Another inevitable type of agility obstacle is the hurdles. They come in a multitude of forms, but the concept is always the same. Your dog has to jump over them.
A standard setup can have tire jumps, bar hurdles, and many other types of jump (panel, wall, double, triple, etc.) The AKC guidelines require at least one bar jump on the course for any given class. So it’s also an essential obstacle to consider.
Weave Poles.
One of the most demanding agility skills to teach your dog is to weave through poles. This obstacle is a straight line of 6 to 12 posts fixed on the ground in which he has to zigzag as fast and accurately as possible. Some beginner agility courses don’t have weave poles, but they are still common obstacles.
Contact Obstacles. (A-Frame, Dog Walk & Seesaw)
It’s on this last group of obstacles that our main focus will be for today. We rarely hear about them, but it doesn’t mean they are unimportant.
Contact obstacles include the dog walk, A-frame, seesaw (also called teeter-totter), and pause table. If you plan to compete in agility, you have to train your dog to master them because sometimes they are required on the course.
Here’s more information about each contact obstacle!
Dog Agility A-Frame Obstacle.
The A-frame consists of two flat and straight panels that form a triangle or A shape. Your dog will have to go up and down the ramps. Each lower bottom part has paint on it, and he must touch them before passing on to the next obstacle. That’s why it’s called “contact obstacles.”
A-Frame Dimensions:
- Panels:
- Width: Between 35 and 49 inches.
- Length: Within 2 inches of 9 feet.
- A-Frame Height: Within 1 inch of 5 feet 6 inches.
- Contact Zone: On the lower 42 inches with ¼-inch tolerance.
Is The A-Frame Required On An Agility Course?
Yes, there will be only one obstacle of this type at every level of competition. Even in an Agility Course Test (ACT), you will have an A-frame set at 5’. Thus, you should train your dog to master this contact obstacle.
| Agility Class | A-Frame | Number of obstacles |
|---|---|---|
| ACT1 | Required | 1 (set at 5′ for all heights) |
| ACT2 | Required | 1 (set at 5′ for all heights) |
| Novice Standard | Required | 1 |
| Open Standard | Required | 1 |
| Excellence/Master Standard | Required | 1 |
Where To Buy An A-Frame?
Dogs learn things by doing them repeatedly. That’s why I highly recommend investing in an A-frame to add to your backyard agility course. It’s relatively expensive, but it’s an essential piece of equipment to prepare your dog for his first trial.
If you’re looking for a high-quality A-frame, check out this one on Amazon. It’s sturdy, portable, and AKC compliant, so it’s perfect for training your dog.
There are concerns you should know too. It’s pricey, and there are no instructions included. But the quality is outstanding, and you can always contact the seller if you struggle to put it together.
Another more affordable option for beginners would be the smaller version of this A-frame. It’s very similar to the product I just mentioned but less expensive and more appropriate for inexperienced dogs. Therefore, this A-frame might be worth considering if you’re just getting started in agility.
An Alternative → DIY A-Frame!
Let’s be honest; not everyone has the money to invest in high-quality agility obstacles right off the bat. That’s not a problem because you don’t need to. If you’re into DIY projects, building an A-frame yourself will allow you to save money and have fun. Here’s how!
- Build The A-Frame Panels With Plywood.
- Add Rungs To Help Your Dog Climb Over The Obstacle.
- Paint The A-Frame Panels. (Contact Zones In Yellow & The Rest In Blue)
- Assemble The Climbing Walls With Hinges.
- Put Something Tubular On The Top Such As A Pool Noodle.
- Let Your Dog Enjoy The A-Frame.
You can find more details in this article from the Instructables website.
A-Frame Training.
Once you have the obstacle, it’s time to practice. The A-frame isn’t the most complicated part of the agility course to teach your dog, but every new piece of equipment can be challenging. So here’s an effective way to approach this contact obstacle.
- Place Your Dog On The Down Side Of The A-Frame. (With A Small Inclination)
- Lure or Encourage Him To Exit The Obstacle.
- Place Your Dog On The Top Of The A-Frame Panel.
- Tell Him To Come Down.
- Place Your Dog On The Upside Where He Can See Over The A-Frame Peak.
- Make Him Go Up & Down The Obstacle.
- Place Your Dog Gradually Closer To The Bottom Of The Upside Panel.
- Repeat The Process Until He Can Walk Through The Whole A-Frame.
- Introduce Him To A Specific Command Such As “Frame” or “Climb”.
- Work On Speed, Increase Inclination & Make Sure Your Dog Hit The Contact Zones.
For more information about this training method, you can read this article.
Overall, the A-frame is an obstacle in the shape of a triangle (A). When it comes to performance, your dog has to climb up and down as fast as possible in the right direction.
He must also touch the contact zone (lower parts of the frame usually painted in yellow) not to get a fault. It’s a common obstacle on an agility course because every standard class group will have to go through an A-Frame.
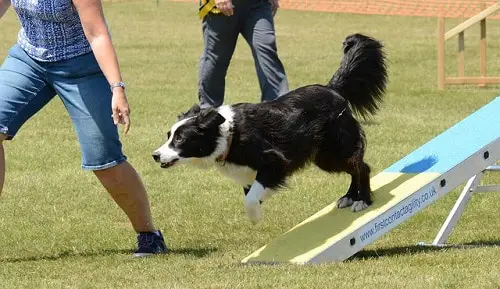
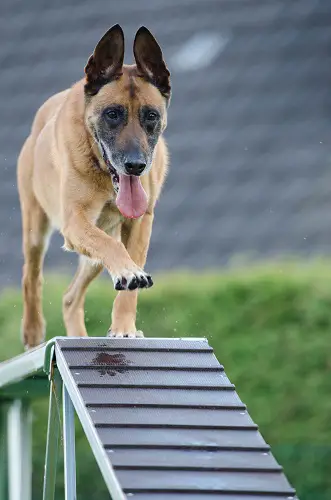
Agility Dog Walk.
The second contact obstacle is very similar to the A-frame but with a walking board between the two panels. In other words, a dog walk consists of two angled ramps at both ends with a long and flat platform relating them. (↗ ── ↘) Again, your dog has to touch the contact zone before exiting the obstacle.
Dog Walk Dimensions:
- Ramps:
- Width: 12 inches +/- 1 inch.
- Length: 12 feet.
- Platform:
- Width: 12 inches +/- 1 inch.
- Length: 12 feet.
- Dog Walk Height: 48 inches above the ground +/- 2 inches.
- Contact Zone: On the lower 42 inches of the ramps with a ¼-inch tolerance.
Is The Dog Walk Required On An Agility Course?
Unless your dog is in the Agility Course Test 1 (ACT1) class, this obstacle is allowed on a competition course. For Standard Classes (Novice, Open, Master), the dog walk is mandatory according to the AKC rulebook. However, it’s important to note that only one obstacle of this type can be on the course.
| Agility Class | Dog Walk | Number of obstacles |
|---|---|---|
| ACT1 | Not Allowed | 0 |
| ACT2 | Allowed | 1 |
| Novice Standard | Required | 1 |
| Open Standard | Required | 1 |
| Excellence/Master Standard | Required | 1 |
Where To Buy An Agility Dog Walk?
If you want to compete with your dog in agility events, training him on this obstacle is essential. Thus, investing in one can be an excellent idea to practice at home. But you should know that it’s another expensive piece of equipment.
I highly recommend checking out this dog walk on Amazon. High-quality, durable, and AKC compliant, it’s the perfect option if you’re looking for professional gear. The same company also makes another dog walk more affordable and appropriate for beginners because it’s shorter.
An Alternative → DIY Dog Walk!
Like with the A-frame, you can build a dog walk yourself to save money. Agility training is fun and beneficial, but you don’t need to go broke to get started. Thus, here’s a step-by-step process to make a DIY dog walk.
What Materials You Will Need?
- 3 Wood Boards. (Ideally 2″ X 12″ X 12′)
- Something* To Support The Center Platform.
- PVC Tubes Base.
- Wood Construction Base.
- Baskets, Stools, Etc.
- Hinges.
- Paint.
*To make your dog walk base, you have a lot of options. Whether you choose to build it with wood, PVC tubes, or laundry baskets you don’t use anymore, it doesn’t matter. As long as it’s safe, sturdy, and stable, everything should be fine.
How To Build Your DIY Dog Walk?
- Make Your Dog Walk Base. (With PVC Tubes, Wood, Etc.)
- Find/Cut The Ramps & Platform. (Ideally 2″ X 12″ X 12′)
- Add Rungs On The Ramps To Help Your Dog Climb On The Obstacle.
- Paint The Dog Walk. (Contact Zones In Yellow & The Rest In Blue)
- Assemble Everything. (With Door Hinges, Screws, Etc.)
- Let Your Dog Enjoy This New Obstacle!
Here’s a video to watch if you want to make a basic agility dog walk in your backyard with wood planks, PVC tubes, and door hinges!
Teach Your Dog To Master The Dog Walk Obstacle!
Since the dog walk is very similar to the A-frame, training your dog on this obstacle shouldn’t be too difficult. Again, you can use the “Reverse Method” to make it as easy as possible for him to learn.
Start by placing your dog on the downward side and encourage/lure him with a treat or toy to exit the ramp. Then, you can slowly increase the distance he has to walk on the platform until he overcomes the whole obstacle.
If you want to grab your dog conveniently and ensure his safety, I highly recommend investing in a harness that has a handle. The Ruffwear Webmaster could help you lift and catch him conveniently while training him on this obstacle.
To sum up, the dog walk is a large platform with two inclined ramps at each end. You can also see it as an A-frame with an additional flat plank in the center.
It’s another common contact obstacle on agility courses. Your dog will have to climb up one ramp, walk on the middle board, and exit the other ramp by touching the contact zone.
Dog Agility Seesaw or Teeter-Totter.
This obstacle consists of a plank supported in the center so each end can go up and down inversely. It’s similar to the swing we used to play with when we were kids, but this one doesn’t require two users.
Your dog will have to climb to one side, wait for the other end of the panel to hit the ground, and exit the obstacle by touching the contact area.
Seesaw Dimensions:
- Plank:
- Width: 12 inches with a 1-inch tolerance.
- Length: 12 feet.
- Teeter Height: 24 inches to the top of the board at the pivot point.
- Contact Zone: On 42 inches of both ends of the plank with a ¼-inch tolerance
Is The Seesaw Required On An Agility Course?
Every standard class except the ACT1 must have a seesaw (only one) on the course. That’s why it’s another essential agility obstacle. If you want your dog to compete, he needs to master the teeter-totter.
| Agility Class | Seesaw | Number of obstacles |
|---|---|---|
| ACT1 | Not Allowed | 0 |
| ACT2 | Required | 1 |
| Novice Standard | Required | 1 |
| Open Standard | Required | 1 |
| Excellence/Master Standard | Required | 1 |
Where To Buy A Dog Agility Teeter-Totter?
There are more options of seesaws than with the other contact obstacles. If you’re looking for a beginner-friendly and high-quality design, you can take a look at this Dog Agility Teeter-Totter on Amazon. You can also consider the Cool Runners Seesaw that’s longer (12’ VS 8’) to meet the standard guidelines for this sport.
An Alternative → DIY Seesaw!
If you can’t afford any dog agility teeter, it’s not a problem. As with any other contact obstacle, it’s possible to build one yourself. Here’s some helpful information to make a DIY seesaw.
What Materials You Will Need?
- PVC Pipe For The Base
- Wood For The Plank. (Ideally 2″ X 12″ X 12′)
- Straps, Bolts & Screws For Attachment.
How To Build A Dog Agility Teeter-Totter?
- Make The Base With PVC Tubes.
- Find/Cut The Wood Plank. (Ideally 2″ X 12″ X 12′)
- Add Weights At Each End Under The Plank. (PVC Pipes Full Of Sand or Gravel)
- Paint The Seesaw. (Contact Zones In Yellow & The Rest In Blue)
- Fix The Plank On The Base.
- Introduce Your Dog To This New Contact Obstacle.
For more details on each step of this DIY project, you can read this article. (Only steps 9 to 16)
How To Train Your Dog With The Agility Teeter-Totter?
Like any other obstacle, there are many ways for dogs to understand how it works. The “Reverse Training Method” is still an option, but not it’s not the best one for the seesaw because the platform moves. Therefore, here’s another idea to train your dog on this new obstacle.
- Put More Weight As Counterbalance On The Starting End.
- Lure Your Dog On The Teeter With His Favorite Toy or Treats.
- Reward Him Every Time He Does Something Good.
- Encourage Your Dog To Continue Walking Up The Seesaw.
- Make Him Cross The Center Point Slowly.
- Go Down The Other Side.
- Reward Your Dog & Give Him A Lot Of Praise.
- Gradually Remove The Extra Counterbalance & Work On Fluidity.
If you want more information and other techniques to train your dog on this contact obstacle, check out this article on the WAG blog!
Overall, the seesaw is a plank that pivots. It’s the most tricky contact obstacle to learn, so I highly recommend training your dog on the A-frame and dog walk before. Then, he should be ready to walk over the agility teeter while touching both contact zones on each end of the plank.
Agility Pause Table or Box.
This obstacle is very straightforward. It’s a platform on which your dog will have to jump on, pause for 5 consecutive seconds, and jump off to continue the agility course.
The judge starts counting as soon as his four paws touch the top surface, and he must stay on it for the rest of the time. It’s an agility obstacle used to show your dog’s control and stability skills.
Pause Table Dimensions:
- Platform: 36-inch square +/- 2 inches.
- Pause Table Height: It will vary according to your dog’s size.
- 8 inches. (For dogs in the 8-inch jump height)
- 12 inches. (For dogs in the 12-inch jump height)
- 16 inches. (For dogs in the 16-inch jump height)
- 20 inches. (For dogs in the 20-inch jump height)
- 24 inches. (For dogs in the 24-inch jump height)
Is The Pause Table Required On An Agility Course?
Whether your dog is just getting started or competes in the Master Standard Class, the pause table is mandatory on most agility courses. Thus, it’s another essential contact obstacle to master if you want him to perform well. But the pause table/box is generally simple to understand.
| Agility Class | Pause Table | Number of obstacles |
|---|---|---|
| ACT1 | Required | 1 |
| ACT2 | Required | 1 |
| Novice Standard | Required | 1 |
| Open Standard | Required | 1 |
| Excellence/Master Standard | Required | 1 |
Where To Buy A Dog Agility Pause Table?
Again, there aren’t many options on the market. For an AKC-compliant pause table, you can check out this one on Amazon. This professional piece of equipment is sturdy, high-quality, adjustable from 8” to 24”.
If you’re looking for something less expensive, the Affordable Agility Pause Table is an excellent alternative. It’s well-made, has a safe design, and comes with 4 sets of legs (8”, 12”, 16”, and 20”) to adjust the height according to your dog’s size.
Build Your DIY Pause Table!
Another option is to make one yourself. You will save money, and it can be a fun project to start too. Therefore, he’s how to build a pause table for your backyard agility course.
What Materials You Will Need?
- Plywood & Wood Boards.
- PVC Tubes.
How To Build A Pause Table?
- Find/Cut The Wood For The Platform. (Ideally 36-inch square)
- Paint The Pause Table. (Top Surface In Yellow & The Sides In Blue)
- Build The Base Of The Obstacle With PVC Tubes.
- Fix The Platform On The Base.
- Let Your Dog Explore & Jump On The Pause Table.
For more details on each step of the process, you can read this article on Cuteness.
Teach Your Dog How To Use The Pause Table!
Once you’ve found or built the right obstacle for your needs, it’s time for training. The pause table should be easy to overcome if your dog is well-trained, but some help and practice are still necessary. Let me share with you an effective method to master this part of the agility course.
- Start With The Pause Table As Low As Possible.
- Keep Your Dog Leashed For More Control.
- Lure Him On The Platform With Treats or Toys.
- Reward Your Dog (With Treats or Playtime) & Give Him A Lot Of Praise.
- Lure Him Off The Table With A Release Command Such As “Off” or “OK”.
- Repeat The Same Process But On The Other Side.
- Work On The 5-Second Pause.
- Slowly Increase The Height Of The Table.
- Remove The Rewards & Get Rid Of The Leash.
- Add The Pause Table To Your Backyard Agility Course.
I’ve based the 10 above steps on this video produced by Purina Pro Plan. You can watch it as visual support.
To sum up, the pause table is an easy obstacle that your dog needs to jump on, wait for 5 seconds, and continue the agility course. Whatever class he’s in, the pause table is generally among the required obstacles. That’s why you need to understand and work on it to perform well in agility competitions.
Not Every Agility Class Has Contact Obstacles.
Depending on which category you want your dog to compete in, you might not have contact obstacles on the course. For example, the dog walk and seesaw isn’t allowed in the Agility Course Test 1 (ACT1) class. On the other hand, the pause table and A-frame are required for this category.
The only group that has no contact obstacles is the Jumpers With Weaves (JWW) class. It’s another type of obstacle course made up of jumps, tunnels, and weaves poles. There’s no contact zone or pause table to slow the team (dog & handler) down, so they can go fast.
| Agility Class | A-Frame | Dog Walk | Seesaw | Pause Table |
|---|---|---|---|---|
| ACT1 | Required (1 set at 5′ for all heights) | Not Allowed | Not Allowed | Required (1) |
| ACT2 | Required (1 set at 5′ for all heights) | Allowed (1) | Required (1) | Required (1) |
| Novice Standard | Required (1) | Required (1) | Required (1) | Required (1) |
| Open Standard | Required (1) | Required (1) | Required (1) | Required (1) |
| Excellence/Master Standard | Required (1) | Required (1) | Required (1) | Required (1) |
| Jumpers With Weaves Classes | Not Allowed | Not Allowed | Not Allowed | Not Allowed |
Other Gear For Dog Agility.
The A-frame, dog walk, seesaw, and pause table aren’t the only pieces of equipment you need to start training your dog for agility. You should also invest in other essential obstacles such as an open tunnel, hurdles, and weave poles.
If you don’t have any of that, this complete set made by CHEERING PET is worth considering. It includes a tunnel, hurdle, tire jump, pause box, weave poles, and other accessories. To have better quality agility equipment, you can also buy each obstacle individually.
Read My Articles About:
Last Thoughts About Dog Agility Contact Obstacles!
Finally, there’s a lot of things to know about the agility course setup before getting started. The A-frame, dog walk, seesaw, and pause table are as important as any other obstacle, even if we don’t hear about them a lot.
As you have seen in this article, they often have to be on the course. So you must train your dog to master every contact obstacle before signing up for an agility trial.
I hope all the information I’ve shared with you today will help you get ready to compete in this sport. For more details about agility training and beginner tips, you can read my article on this subject. Now it’s time to go out and have fun with your dog on the course!
